How to Restore Office 365 Backup
Data loss can have severe consequences for businesses. That's why having a reliable backup solution for your Office 365 environment is crucial. This guide will walk you through the step-by-step process of restoring your Office 365 backup, ensuring that your valuable data is recovered safely and efficiently. Whether you need to recover a single email, a SharePoint document, or an entire mailbox, we've got you covered. So, let's dive in and learn how to restore your Office 365 backup with ease and peace of mind.
STEP 1
To log in to the self-service portal to restore your emails, files, or other data, go to this
URL: https://ezy-portal.ezynode.com.au:4443/ and type your O365 email address in the space provided.
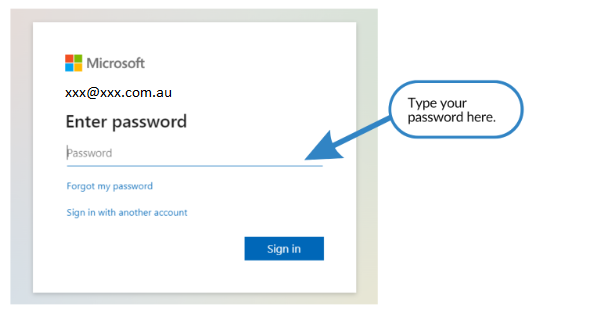
 STEP 2
A prompt will pop up to enter your password.
STEP 3
When you click the Sign In Tab, the approval sign-in request Authentication Code will appear in your self-service portal.

Note:
Steps 4 and 5 are optional only if the user has an authenticator app and if that app is Microsoft Authenticator as shown below otherwise, the steps here would differ depending on what authenticator you use.
STEP 4
You will receive a prompt on your mobile device through the Microsoft Authenticator App.
Copy the number from the self-service portal screen and enter the code in your Microsoft Authenticator App. Click Yes.

STEP 5
Tick the box and click Yes, if you would like to reduce the number of times you are asked to sign in.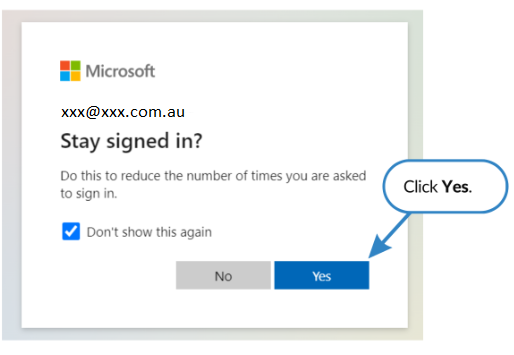
STEP 6
Once you have successfully logged in, you will see the Select Restore point on the upper left-hand pane. STEP 7
If the user is an operator, select which account he/she needs to check and/or restore by selecting the "Scope Column".

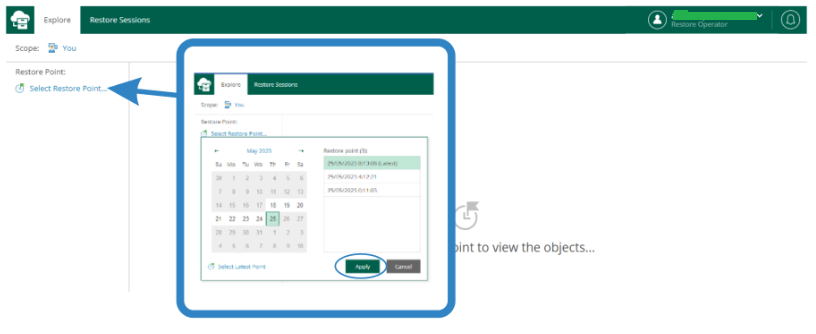
STEP 8
This step will allow you to select the date coverage of the data you want to recover.
Note that it will take the duration of when the backup was initiated.
Click the "Select restore point". Select your preferred date coverage for the data recovery.
Click Apply.
STEP 9
This will bring you to the list of files on your machine. On the left-hand side, you will see the Navigation Pane where you can expand the list of different data such as One Drive, Email, Files, and other data.
 STEP 10
Click on the arrow ( > ) of your selected restore point to expand the folders. Choose a specific file that you would like to recover.

STEP 11
Tick the boxes of the email/s that you would like to recover.
Once you are satisfied with your selected data, click "Restore".

STEP 12
It will prompt you the four tabs namely Items, Restore mode, Reason, and Summary:
In the "Items" Tab, specify the item's name and Click "Next".
STEP 13
In the second Tab, "Restore mode", tick in where do you want to restore items either to the original location or another location. For this example, we are going to tick the another location.
 STEP 14
Before you click Next, we suggest the creation of a new folder in your outlook if you would like to consolidate all the restored emails in one location.
By doing so, go to the Outlook Inbox and click "Create New Folder" and type your desired folder name. For instance, "Restored Emails".

STEP 15
Type the folder's name of the new location here. Then, click "Next".

STEP 16
In the third tab, "Reason", type the reason to perform the restore operation. For example, "for review".
Click "Next".

STEP 17
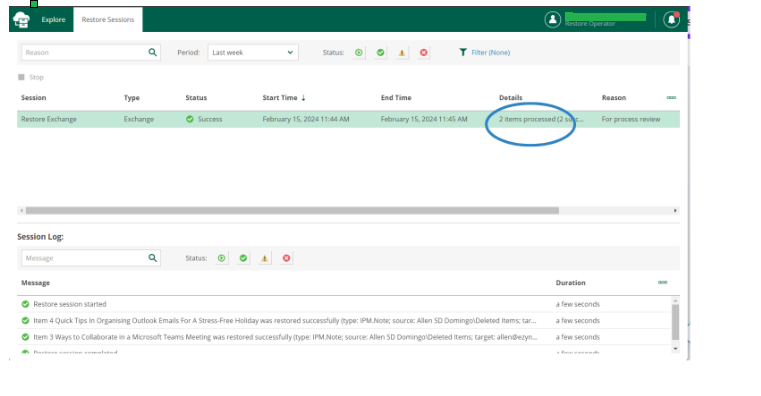
Review the Exchange Restore information "Summary" Tab and click "Finish".
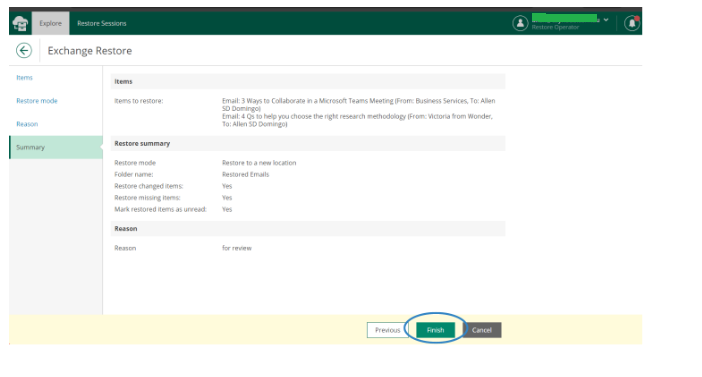
Finally, the Restore Exchange is completed.
The 2 emails are now ready for viewing.
STEP 18
View the recovered emails are now available inside the "Restored Email folder "of your Outlook account.

I hope you find this article helpful.
For enquiries, please contact us at (02) 9094-4300 or send an email at services@4siteit.com.au or support@4siteit.com.au.