
At the start of almost every Microsoft course I teach, I discuss the options you have to customise any of the Microsoft Office products. The Quick Access toolbar (QAT) is right up there on my list of favourite ways to make each program work better for me.
All the Office programs have the QAT including Access, Excel, OneNote 2016, Outlook, PowerPoint and Word. This toolbar allows you to customise and add commands from the program onto the toolbar. Think of it as a location to hold all your favourite commands.
The QAT is always on the screen and doesn’t move even when you are navigating between the different tabs. Below you can see what my QAT looks like with my favourite commands shown for Excel.

Each applications’ toolbar is individual so if you customise the toolbar in Word, the same changes will not be present in Excel. You can customise each one individually because each program has different features.
The Quick Access Toolbar can be displayed in two different locations. By default, it is shown in the top left corner of the application, above the Ribbon area. You also have the ability to move the toolbar below the Ribbon area which gives you the advantage of a wider area to display command buttons in.
The Quick Access Toolbar is a huge time saver as it removes the need for you to switch between multiple tabs on the ribbon when working with features you use frequently. Instead, add them to the toolbar for quick and easy access.
In my examples I’m using Microsoft Excel 365 to show the Quick Access Toolbar location options below:

There are three methods available for customising the Quick Access Toolbar, I personally tend to use method 3, however, pick the one you prefer and get customising!
1) Customise the QAT using the menu
Each program provides you with some suggested commands you may use on a regular basis. You can also browse through all commands within the application and select the ones you wish to include in the toolbar.
To include a suggested command, follow these steps:
- Click on the drop-down menu displayed on the right-hand side of the Quick Access Toolbar

- You will see some suggestions available which include New, Open, Email etc

- If you wish to add any of the options to the toolbar simply click the command and you will see the button is added to the toolbar
- The buttons will appear in the order that you select them; you can change the order as shown later in this post.
2) Customise the QAT using the More Commands option
If you use a particular function on a regular basis, save yourself some time by adding it into the Quick Access Toolbar. If you wish to add another command which is not in the suggested list above, follow these steps:
- Click on the drop-down menu displayed on the right-hand side of the Quick Access Toolbar
- From the menu select More Commands
- The Excel Options dialog will appear:
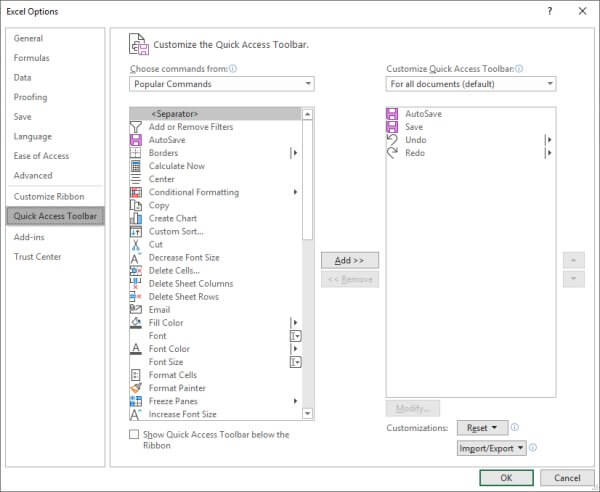
- You will see the list displayed is from the Popular Commands category
- Click the Choose commands from drop-down menu and you will also see you can view Commands Not in the Ribbon, All Commands and Macros plus you will see an option to view the command buttons included on each individual tab from the Ribbon
- Spend a few moments and go through these options so that you become aware of what you can add to the toolbar
- Now select the area you wish to choose a command from. For my toolbar I want to include the AutoSum command button so I will select Formulas tab, then I’ll scroll down to locate the AutoSum button
- Select the command and click the Add button or you can alternatively double-click the command and it will be added to the Quick Access Toolbar which is displayed on the right
- If you wish to change the order that the command buttons appear on the toolbar simply use the Move Up and Move Down buttons to the right of the Quick Access Toolbar list

- Once you are happy with the commands and the order they appear, click OK to view the customised toolbar

3) Customise the QAT using the mouse
The final method is using the right mouse click option.
- Find the command on the Ribbon you wish to include on the Quick Access Toolbar
- Right mouse click on the command and from the shortcut menu select Add to Quick Access Toolbar
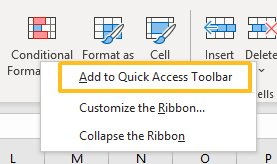
- Voila, the command is now displayed on the toolbar
One important tip I give when showing people how to customise the toolbar is not to put too many commands on it. Not only does it make the toolbar very wide but it means that instead of giving you a time-saving feature you will end up spending more time scanning through the commands shown to find the exact one you are after. I suggest up to approx. 12-15 commands are great, many more than that and you will potentially be counter-productive.
To change the location of the toolbar
To change the location of the toolbar, follow these steps:
- Click on the drop-down menu displayed on the right-hand side of the Quick Access Toolbar
- Select Show Below the Ribbon
- To move the toolbar back to the top, repeat the process and you will see the Show Below the Ribbon option has changed to Show Above the Ribbon
Remove commands from the Quick Access Toolbar
If you decide you wish to remove items from the toolbar, simply right mouse click the command icon and select Remove from Quick Access Toolbar.
My last great tip is the ability to import/export any customisations you have made on your toolbar and use them on different computers. If you wish to customise the toolbar and use the same customisation across multiple computers then you can simply export a customisation file, copy the file to a USB or network drive, then import the customisations into another copy of Microsoft Office.
To import/export, follow these steps:
- Click on the drop-down menu displayed on the right-hand side of the Quick Access Toolbar
- Select More Commands
- In the bottom right corner, you will see the Import/Export button

- Simply select the option you wish to use: Import customization file or Export all customizations
- If you export all customisations then ensure you save the file to a location you will be able to find, such as the Desktop. You can then transfer the file to a USB, network drive or email the file to be accessed from another computer.
- To import simply open the application on the other computer, click the drop-down menu for the Quick Access Toolbar and select More Commands. Click the Import/Export button and choose Import customization file, navigate to the file and select it. A warning message will be displayed alerting you that all current customizations will be replaced if you are sure click Yes. The customisation will now be imported.
I hope you have enjoyed this post about using the Quick Access Toolbar. This is a very popular topic in any of my training courses so be sure to check out this great time-saving feature.
Reference : https://www.thetraininglady.com/customise-quick-access-toolbar/