
The Table of Contents (TOC) feature relies on the use of heading styles for it to work.
A TOC can display headings and page number references for topics within a document and is usually located within the first couple of pages of the document. You can include multiple heading levels such as a chapter heading and then multiple subheading levels.
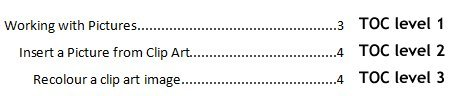
The TOC level refers to which level within the hierarchy, the heading will be displayed. Each TOC level is displayed at a different indentation point within the TOC to make identification of main headings and subheadings easy. Any style used within Microsoft Word can be included in a table of contents, so you are not limited to using the standard Heading 1, Heading 2, or Heading 3 styles.
Create a Table of Contents
To create a TOC, follow these steps:
- Open Microsoft Word
- If you have a document where you would like to include a table of contents, press Ctrl + O and locate/open the document
- If you do not have a document to use for this exercise, feel free to download my sample file as shown below:

- Apply the following styles to each heading as shown below. Here’s a tip to save you time: highlight the first heading “Basic Operations” and apply Heading 1, now scroll through the document and locate the heading “Printing Functions” which also needs to be formatted as Heading 1, highlight the heading, and press F4 on the keyboard, this will “repeat” your last action and apply the heading 1 style again. Repeat this for the rest of the headings to be formatted as Heading 1, then return to the start of the document and repeat the process, and format the remaining headings as Heading 2.
| Basic Operations | Heading 1 |
| Opening existing documents | Heading 2 |
| Using Save As | Heading 2 |
| Printing Functions | Heading 1 |
| Using Print Preview | Heading 2 |
| Printing a Document | Heading 2 |
| Word Tools | Heading 1 |
| Using AutoCorrect | Heading 2 |
| Using AutoText | Heading 2 |
| Working with Pictures | Heading 1 |
| All remaining headings | Heading 2 |
- Press Ctrl + Home on the keyboard to return to the start of the document
- Press Enter 3 times to insert 3 x blank lines
- Press Ctrl + Enter to insert a Page Break so that the content of the document begins on Page 2, press Ctrl + Home again
- Select the References tab and click the Table of Contents button
- From the options available select Custom Table of Contents
- The Table of Contents dialog box will now appear:
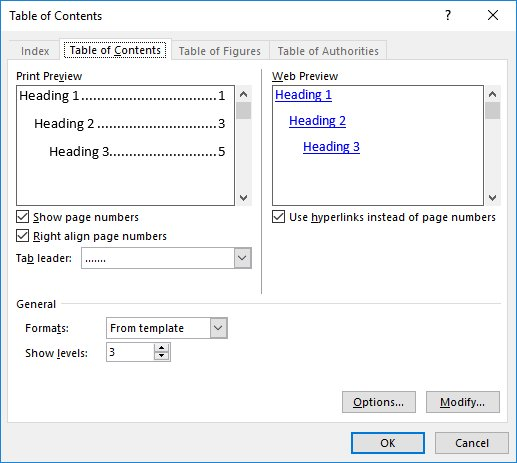
- Because we have only used Heading 1 and Heading 2 in our styles let's adjust which heading styles will be included in the Table of Contents
- Click the Options button
- In the TOC level field box remove the number 3 from the TOC level for Heading 3
- Click OK twice
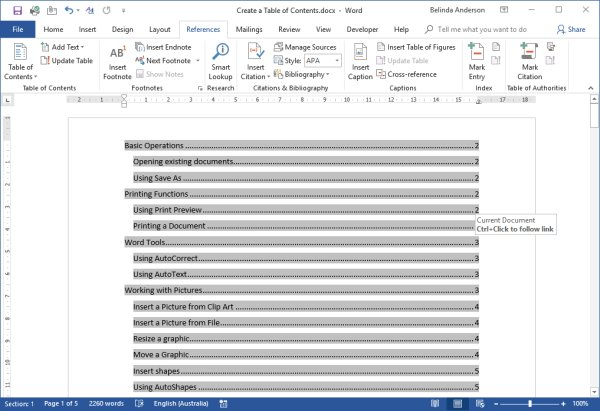
- The Table of Contents will now be inserted into the top of the document

- You can now include a heading above the table of contents but be sure not to use the Heading 1 or Heading 2 style or this will be included into the table of contents
- To refresh the table of contents when you create new headings or edit an existing heading, place your cursor inside the TOC area, the TOC will appear with grey highlights
- Press F9 on the keyboard to refresh the TOC, you will be prompted to update the page numbers only OR the entire table. Press OK once you have made your selection and the TOC will be updated.
I hope this has provided an introduction to adding a table of contents to your document.
Reference: https://www.thetraininglady.com/create-table-contents-word/