
Microsoft Excel is a fantastic program allowing you to collate, analyse and sort data in various formats. Gone are the days of needing a calculator beside you to manually work out results from your data analysis. Microsoft Excel has the ability to perform this and more for you all with a few clicks of the mouse.
It is important to understand a few basic concepts of using Excel prior to working with functions or calculations. You should understand the difference between the terms function and formula, how BODMAS is used in Excel, how to use the formula bar and guidelines for typing a formula or function. I recommend you go through my post on Formula basics in Excel prior to attempting the following exercises.
In this post, I would like to introduce new users of Microsoft Excel to some of the commonly used functions. These include AutoSum/SUM, AVERAGE, COUNT, MIN, and MAX.
Microsoft Excel provides an easy-to-use interface for users to enter and perform calculations within a spreadsheet. Calculations such as: adding, subtracting, multiplying, dividing, plus being able to calculate the average, minimum and maximum values are just a few of the hundreds of different types of calculations available as built-in functions within Excel.
A few tips
A common issue I see new users make is incorrectly entering values into a calculation. It is important that any value you wish to include in a calculation should be entered into a cell of its own. Although this may seem like more work, to begin with, the benefits of this far outweigh the time it will take you to set this up.
Here is an example of good versus bad ways to enter data:

In the example above you can see the way in which the total sales for January and February have been calculated.
For the calculation for January, this shows the correct way to create a calculation. The value for each consultant is displayed in individual cells and the formula created is referencing the cell names (E.g. B4) and then adds each cell value together. E.g. =B4+B5+B6. You can easily adjust any of the value amounts as they are easily visible in their separate cells and the value displayed in the total will automatically update.
For the calculation for February, this shows that the values for each consultant have been displayed in individual cells (which is great) however for the total to be calculated the user has manually typed the actual values directly into the calculation E.g. =61+66+38. If any of the values changed, we can change the individual cells manually however the calculation would not automatically update to reflect the difference.
AutoSum or SUM function
Microsoft Excel has a built-in function called AutoSum, which allows you to quickly and easily add a range of cells together. AutoSum will automatically locate the closest adjacent cells containing data and provide the function and cell references to complete the addition of the values. AutoSum is also referenced as SUM and both use the exact same Function (SUM) however AutoSum automatically tries to complete the function for you.
Let’s jump right in and begin.
- Open Microsoft Excel (I’m using Excel 2016)
- You will see a new blank workbook, type the following text into the worksheet, you do not need to worry about formatting the font if you do not wish

- We will now use the AutoSum feature to work out the total for each person’s sales figures
- Place your cursor in cell F4
- You will now use AutoSum to automatically total the cells from B4, C4, D4, and E4
- From the Home, tab select the AutoSum button from the Editing group (located on the right side of the Ribbon)

- You can either click directly on the AutoSum button or click the drop-down arrow to the right of the button to view all options and click Sum
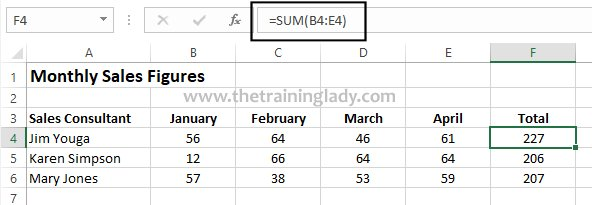
- You will notice that Microsoft Excel has automatically entered the SUM formula, including cell references, into cell F4

- Read through the format of the function:
=SUM(B4:E4)
The equals sign tells Microsoft Excel to perform a calculation
The word SUM tells Excel which function to perform (e.g. Sum the values together)
The B4:E4 tells Excel which cell range to add together
- If you are satisfied that the formula is going to perform the correct function and use the correct range of cells, press Enter once
- The total will now be displayed
- Repeat this for the remaining totals or if you are familiar with how to use Autofill, then you can use this method
- As a little exercise, place your cursor in cell B6 and change the value to 180, when you press Enter on the keyboard you will see the total at the end of the row changes to change this value within the calculation
- Now repeat the process and change the value back to 57
Formula bar
The formula bar within Microsoft Excel allows the user to view or display the contents of the active cell. The formula bar can be used to manually enter a formula into a cell, edit an existing formula or function and view a formula or function. It is important to remember that the values you see displayed in a cell can be information that has been manually typed or can be the result of a formula or function which is active within a cell. If you want to see where the data is coming from, select the cell and check the formula bar.
- Place your cursor in cell F4
- Look at the formula bar to view the formula contained within the cell:
AVERAGE function
The Average function allows you to calculate the average of the values set within a range of cells. The values can be numbers and names or references that contain numbers.
- Place your cursor in cell E8
- Type the heading AVERAGE RESULT
Note: You may need to adjust the width of the columns to ensure the text fits into the column nicely
- Place your cursor in cell F8
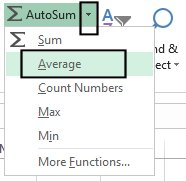
- From the Home tab select the drop-down button adjacent to the AutoSum button and click the Average option
- Microsoft Excel will now try to identify which range of cells you wish to calculate the average for, we want to calculate the average total for the sales consultants, you will, therefore, need to ensure that cells F4:F7 are selected

- Click the Enter key to accept the formula
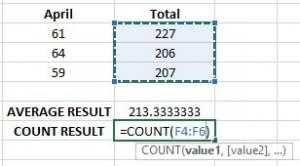
- The average of the values will now be displayed
COUNT Function
The Count function allows you to count the number of cells that contain numbers or numbers within a list of arguments. The count function often gets people a little stuck because users assume that the function can count any type of data. A good example is if you have a spreadsheet with all your customers listed and you want to know how many customers you have, a user will create the count function and try to have Excel count the customers’ names, they then receive an error and are not sure why. The Count function only works on numbers, so you cannot use this function to count text. The best way around this is to use a column of data such as a customer’s phone number or postcode and use the count function to count this data instead.
- Place your cursor in cell E10
- Type the heading COUNT RESULT
- Place your cursor in cell F10
- From the Home, tab select the drop-down button adjacent to the AutoSum button
- Click on the Count Numbers function from the list
- You will see that Excel tries to select the two cells directly above the current cell, we want to count how many consultants we have so use the left mouse button to select cells F4 to F6
- Now you can press the Enter key on the keyboard
- Microsoft Excel will now count the number of numeric values within the specified cell range and will display the value as 3
MIN Function
The MIN function enables users to calculate the minimum value displayed within a range of values. No longer do you need to skim through the data manually to spot the lowest value, use this function to do it for you? If any values in your worksheet change which would affect the answer for this function, the function will update automatically where needed.
The MIN function is useful for: determining the lowest cost of an item; the lowest quantity; the lowest percentage or dollar amount.
- Place your cursor in cell E12
- Type the heading MINIMUM RESULT
- Place your cursor in cell F12
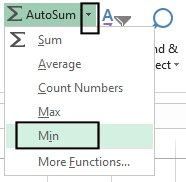
- Repeat the process used previously and locate the MIN function within the AutoSum drop-down
- Ensure the correct cell range is being referenced and then press Enter
- Microsoft Excel will now display the smallest value from the cell range specified being 206
MAX Function
The MAX function is used when trying to determine the maximum or highest value from a range of cells or values.
- Place your cursor in cell E14
- Type the heading MAXIMUM RESULT
- Place your cursor in cell F14
- Repeat the process used previously and select the MAX function from the AutoSum drop-down menu

- Ensure the correct cell range is being referenced and press Enter
- Microsoft Excel will now display the maximum value from the cell range specified being 227
I hope you have enjoyed learning to use some of the easy Microsoft Excel functions.